Someone requested updated presets in this article.
I noticed that it still contained instructions for creating the
"old" type of racks—with multiple amps inside one preset.
It's time to update that approach and introduce a better method.
I might create a video showcasing this, but for now, this text guide will have to do.
The new way
In the old article, all the amps were placed inside one audio effect rack.
Another rack contained the guitar cabs. Having one rack
per amp and one per cab allows you to mix and match them more flexibly.
The good Neural Amp Modeler captures come with a variety of settings,
allowing you to have a complete amp as a single preset.
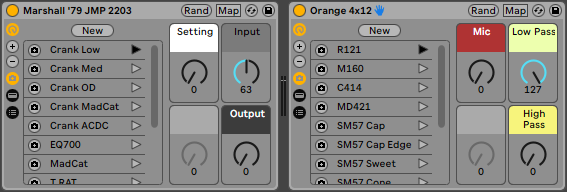
- Add an Audio Effects Rack. Show the Device Chain list and add an instance of Neural Amp Modeler to it (see 1.).
- Inside Neural Amp Modeler, adjust its settings you want as the default. For example, I turn off the EQ and the noise gate. The Input and Output parameters are very useful to quickly adjust the gain.
- Turn on the Macro controls and map the Input and Output parameters to them.
- Map the Chain Selector to a macro (see 2.) and map the device's On/Off switch to the same macro you mapped the Chain Selctor to.
- Finally, add one Macro variation (see 3.).
You can colour code and rename your macros. If you rename the unused
macro to just a " " (space), it will look nicer.
That’s your amp preset. Save it, and whenever you want to add an amp, use it as a starting point. Let’s do that now.
- Open the Neural Amp Modeler instance in the chan.
- Load your first capture and rename the chain to something relevant (here it's Crank Low).
- Duplicate the chain.
- Open Neural Amp Modeler again and load a different capture.
- Rename its chain, duplicate add a new one, etc.
Repeat that until you've added every capture you want your amp to have. The next step involves opening the Chain Select Editor and adjusting the zones that every chain occupies its own. Make the zones as narrow as possible (1 width, see 4.). The old way distributed the zones equally amongst the chains, but that's not necessary. This way it's easier to add new captures without adjusting everything.
In the Macro Mapping window adjust the Device On parameter for every chain: set it to the zone value from before, in both the Min and Max fields (see 5.). Now you can add a Macro variation for each chain. Set the "Setting" Macro to each chain number and save it, starting from 0 and keep increasing it.

For the cabs, it's the same principle. Instead of Neural Amp Modeler, you would add an IR loader. Ableton Live has a native IR loader — the Hybrid Reverb effect. Unfortunately, it's only available in the Suite version. I am using Ableton Live Standard, so I use a 3rd party IR loader: Lancaster Audio's Pulse. You can use any IR loader you like though.
Instead of the Input and Output parameters of Neural Amp Modeler, I mapped the IR loader's high and low-pass filters. You can add anything you think you'll tweak often.
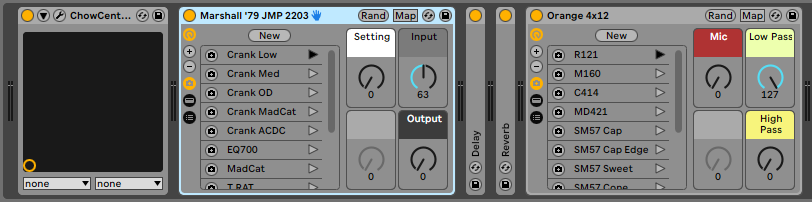
Once you're done, it should look like on the picture above. You can combine your amps and cabinets however you like. You can add effects, built in Live effects or plug-ins. You can even simulate something like an effects loop by adding the effects between the amp and cabinet.
Ableton Live 11 Cabinet Preset
The Ableton Live devices above require Neural Amp Modeler and Lancaster Audio's Pulse installed.